


Cisco SPA 501G, 502G, 504G, 508G, 509G, 514G, 525G, 525G2 manual configuration
- Before configuration you need to have an active account with us.
- Start up the phone and identify its IP Address – using the menu key on the phone, go to the “Network” option and press the “Select” button. For this example we will assume the IP Address of the phone is 10.0.0.126
- Point your browser to the web interface of the phone: http://10.0.0.126
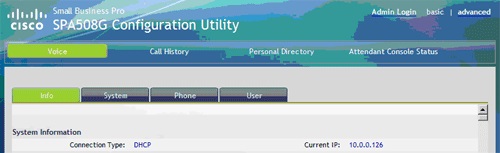
- Click on the “Admin Login” link, and next click on the “Advanced” link at the top of the page to the phone’s advanced administration page
Please check here how to configure for Residential VoIP
- Check your device credentials via MY ACCOUNT > Personal details > Devices
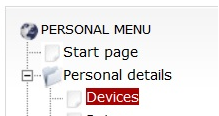
- Your login/password are coming from MY ACCOUNT > Personal details > Devices:

- We now need to set the phone to register with Australian Phone. Click on the “Ext1” tab, and configure as follows:
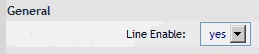
- Set the “Line Enable” field to “yes
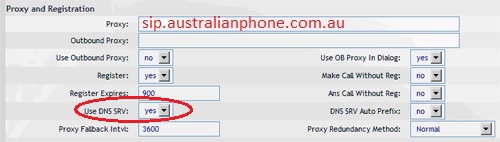
- In the “Proxy and Registration” section, set the “Proxy”: sip.australianphone.com.au
- Set Use DNS SRV: Yes
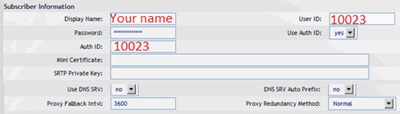
- In the “Subscriber Information” section:
- Set the “Display Name” field to the name you want to appear on the Phone display
- Set the “User ID” field to the Device extension number (what you got from MY Portal device information above)
- Set the “Password” field to the extension’s Device Password (what you got from MY Portal device information above)
- Set the “Use Auth ID” field to “yes”
- Set the “Auth ID” field to the extension’s Authentication ID
- In the “Dial Plan” section, set the “Dial Plan” field to “[x*].” (without the quotes)

- Next, we need to configure the Voice Mail Number on the phone to be able to retrieve Voice Mail messages. Click on the “Phone” tab and set the “Voice Mail Number” field to your system’s Special Voice Mail Extension Number - 09003.

- Next, we need to adjust the audio parameters. Click on the “SIP” tab and, in the “RTP Parameters” section, set the “RTP Packet Size” field to “0.020”
- Now, NAT (Network Address Translation should be configured)
- Go to the “Ext1” tab
- Go to the “NAT Settings” section
- Set the “NAT Mapping Enable” field to “yes”
- Set the “NAT Keep Alive Enable” field to “yes”

- Go to the “SIP” tab
- Go to the “NAT Support Parameters” section
- Set the “Handle VIA rport” field to “yes”
- Set the “Insert VIA rport” field to “yes”
- Set the “STUN Enable” field to “yes”
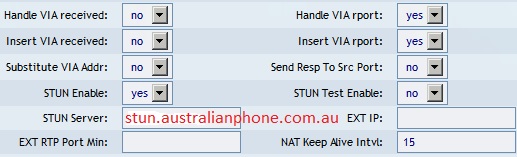
- Set the “STUN Server” field to “stun.australianphone.com.au” – to allow the phone to discover its external IP Address, and the port mappings that will be applied to the traffic sent and received by the phone
- Click the “Submit All Changes” button at the bottom of the page. Your phone will restart. After rebooting, the phone will register with Australian Phone Company.
- Make a test call to free 09002 number.
Please check here how to configure for Cloud PBX
- Login into Cloud PBX Portal.
- Create a SIP softphone device if you don't have any spare: How to create Device in Cloud PBX
- Navigate to "Devices". Click tool button on the right of required Device to see credentials.
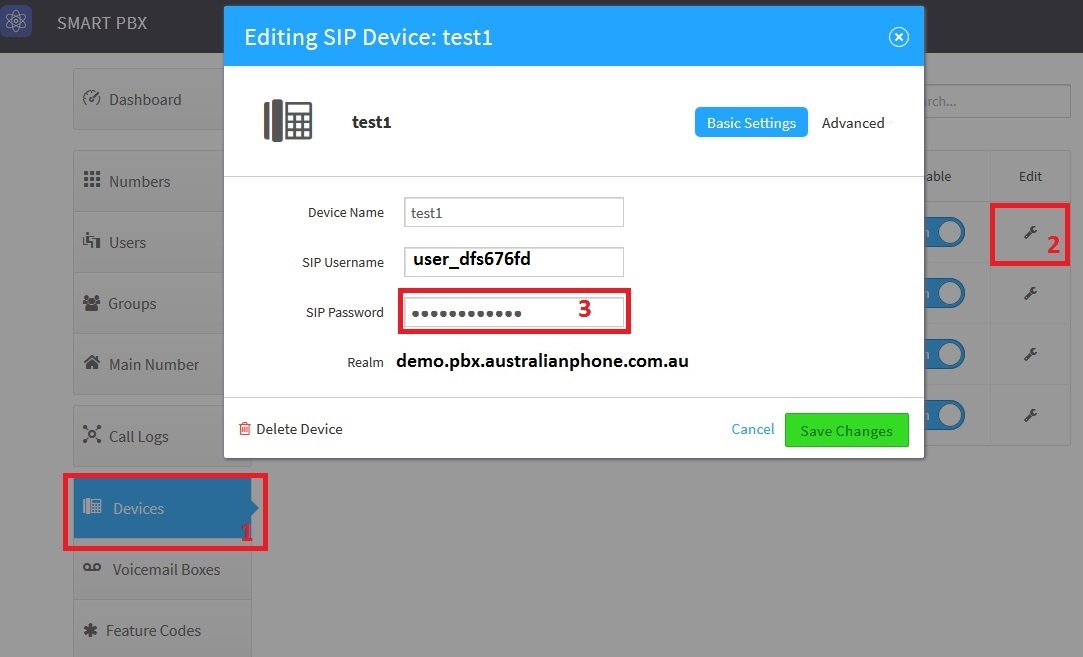
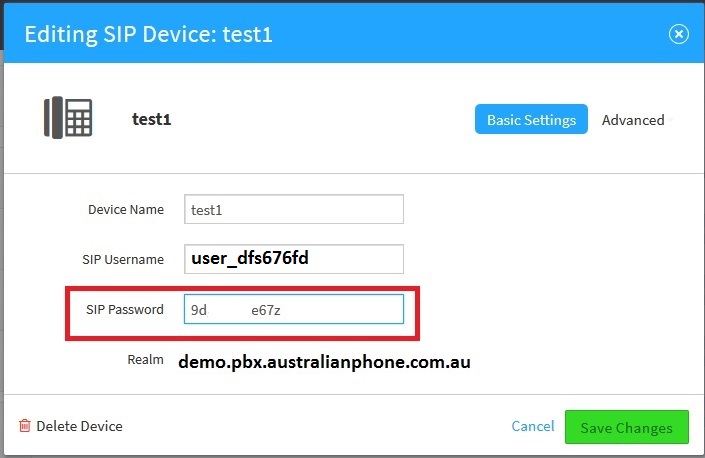
- Your SIP Username, Password and domain will be displayed:
- We now need to set the phone to register with Australian Phone. Click on the “Ext1” tab, and configure as follows:
- Set the “Line Enable” field to “yes
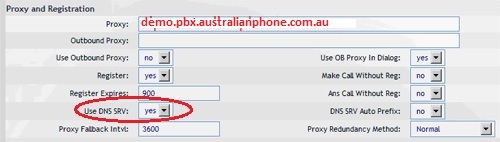
- In the “Proxy and Registration” section, set the “Proxy”: as Realm in your PBX Device settings (demo.pbx.australianphone.com.au in example)
- Set Use DNS SRV: Yes
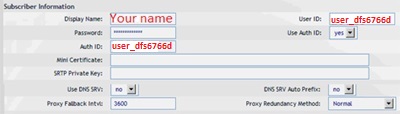
- In the “Subscriber Information” section:
- Set the “Display Name” field to the name you want to appear on the Phone display
- Set the “User ID” field to the SIP Username from PBX Device settings
- Set the “Password” field to the extension’s SIP Password from PBX Device settings
- Set the “Use Auth ID” field to “yes”
- Set the “Auth ID” field to the SIP Username from PBX Device settings
- In the “Dial Plan” section, set the “Dial Plan” field to “[x*].” (without the quotes)
- Next, we need to configure the Voice Mail Number on the phone to be able to retrieve Voice Mail messages. Click on the “Phone” tab and set the “Voice Mail Number” field to your system’s Special Voice Mail Extension Number - *98.
- Next, we need to adjust the audio parameters. Click on the “SIP” tab and, in the “RTP Parameters” section, set the “RTP Packet Size” field to “0.020”
- Now, NAT (Network Address Translation should be configured)
- Go to the “Ext1” tab
- Go to the “NAT Settings” section
- Set the “NAT Mapping Enable” field to “yes”
- Set the “NAT Keep Alive Enable” field to “yes”
- Go to the “SIP” tab
- Go to the “NAT Support Parameters” section
- Set the “Handle VIA rport” field to “yes”
- Set the “Insert VIA rport” field to “yes”
- Set the “STUN Enable” field to “yes”
- Set the “STUN Server” field to “stun.australianphone.com.au” – to allow the phone to discover its external IP Address, and the port mappings that will be applied to the traffic sent and received by the phone
- Click the “Submit All Changes” button at the bottom of the page. Your phone will restart. After rebooting, the phone will register with Australian Phone Company.
- Make a test call to free 09002 number.
If you require to use BLF fuctions (Shared line appearance)
- Navigate to "Attendant Console"
- Enable Server Type "Asterisk"

- Navigate to "Phone" tab:
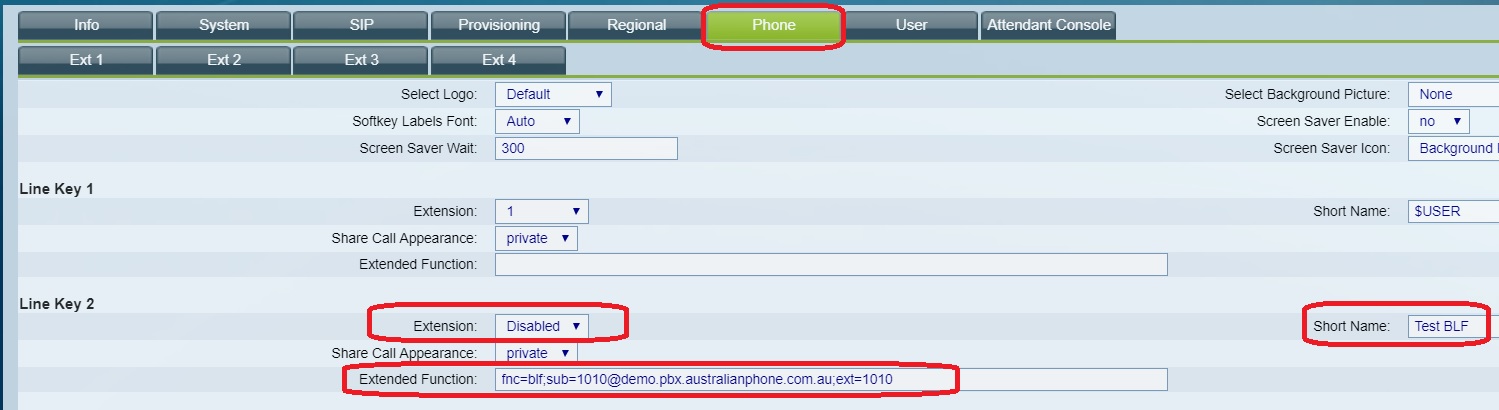
For Required Line Key, Set:
- Extension: Disabled
- Stort Name: Friendly Name of another Extension
- Shared Call Appearance: private
- Extension Function: fnc=blf;sub=Number@Domain;ext=Number
- Where Number - Another Extension Number such as 1000,100, etc...
- Where Domain - your indivisual Real in PBX