VoIP Phones Shop  

SIP-T46U Add 1-500x500


30 days money back


Cisco SPA-112/122 or ATA-191-3PW-K9 VoIP SIP adapter configuration manual

  • Before configuration, you need to have an active account with us.

  • If you don't have an adapter, you may purchase it here: Buy Cisco ATA-191 phone adapter

  • Connect your device's power and ethernet cables.

    For users with the SPA112 or ATA-191-3PW-K9:
    Connect your router with the supplied Ethernet network cable to the SPA112's internet port. Now connect your phone to the SPA112's Phone 1 port. Finally, plug the supplied power cable into the SPA112.

    For users with the SPA122:
    Connect your router with the supplied Ethernet network cable to the SPA122's Internet port. Temporarily connect your computer to the SPA122's Ethernet port using an Ethernet network cable (this is necessary as the SPA122 will not allow you to access the web configuration interface without changing the default web password). Now connect your phone to the SPA122's Phone 1 port. Finally, plug the supplied power cable into the SPA122


  • Wait 60 seconds after plugging your SPA112/SPA122 in.

    Pick up the phone connected to the SPA112/SPA122 and dial the * key on your phone 4 times.

    For users with the SPA112 or ATA-191-3PW-K9:
    Have a pen and paper ready. You will hear a message - Enter a menu option, then enter 1 1 0 on your phone. You will now hear a message giving you the IP address of your SPA112 such as - "192.168.001.010" and write this number down.

    For users with the SPA122:
    Have a pen and paper ready. You will hear a message - Enter a menu option, then enter 2 1 0 on your phone. You will now hear a message giving you the IP address of your SPA122 such as - "192.168.001.010" and write this number down.

  • Open a web browser on your computers such as Firefox or Chrome and enter the IP address you heard in step 4 as the address (I.E. where you would normally enter www.yahoo.com).

    Please note: some browsers will require you to remove leading zero's ( 0 's ) in the IP address. For example, if you heard "192.168.001.010" you should change this to "192.168.1.10".

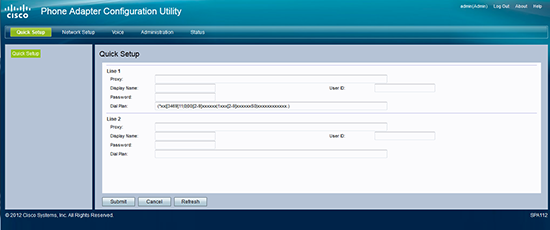
    You should now see a page that looks like this:

 cisco spa 112 01

    • Enter the default credentials in the appropriate fields. For the SPA112/SPA122 please specify "admin" as the username, and "admin" as the password (without quotes).

    • After entering the password you should see a screen that looks similar to the one below:cisco spa 112 02


Please check here how to configure for Residential VoIP

  • Check your device credentials via MY ACCOUNT portal > Personal details > Devices

 mor devices

  • Your login/password are coming from MY ACCOUNT portal > Personal details > Devices:

mor dev settings


Use these settings to input into SPA-112/122 quick setup:

  • Set Proxy as: sip.australianphone.com.au
  • Set Display Name: Username for your Device Settings above
  • Set User ID: Username from your Device Settings above
  • Set Password: Password from your Sevice settings above
  • Insert next Dial Plan: (000|0011xxxxxxxxxxxxxxx|1300xxxxxx|13[1-9]xxx|1800xxxxxx|0[2345678]xxxxxxxx|[2-9]xxxxxxx|09xxx) 
  • Click Submit and your adapter will be shortly restarted

spa112-config2

Once restart copmpleted login into adaper once again to make the final configuration.

        • Navigate Voice > Line 1
        • Set NAT Mapping Enabled > Yes and NAT Keep Alive Enable > Yes, see picture below

nat en

        • Scroll the same page down and set: Use DNS SRV: Yes

srv en

        • Click Submit and you adaptor will be shortly restarted

        • Your adaptor is ready to use, you should see three green lights (Power, Internet and Line 1 registration).
        • Make a test call to 09002 free number to check your sound.

            Please check Cisco SPA 112/122 user manual if you require more detailed information.

Please check here how to configure for Cloud PBX

        • Login into Cloud PBX Portal.
        • Create a SIP ATA device if you don't have any spare: How to create Device in Cloud PBX
        • Navigate to "Devices". Click tool button on the right of required Device to see credentials.

device pass1

        • Your SIP Username, Password and domain will be displayed:
device edit1

Use these settings to input into SPA-112/122 quick setup:

  • Set Proxy as your Realm from device settings (demo.pbx.australianphone.com.au in example)
  • Set Display Name: SIP Username for your Device Settings above
  • Set User ID: SIP Username from your Device Settings above
  • Set Password: Password from your Sevice settings above
  • Insert next Dial Plan: (000|0011xxxxxxxxxxxxxxx|1300xxxxxx|13[1-9]xxx|1800xxxxxx|0[2345678]xxxxxxxx|[2-9]xxxxxxx|09xxx|1xxx)
  • Click Submit and your adapter will be shortly restarted
spa 112 pbx

Once restart copmpleted login into adaper once again to make the final configuration.

        • Navigate Voice > Line 1
        • Set NAT Mapping Enabled > Yes and NAT Keep Alive Enable > Yes, see picture below

nat en

        • Scroll the same page down and set: Use DNS SRV: Yes

srv en

        • Click Submit and you adaptor will be shortly restarted

        • Your adaptor is ready to use, you should see three green lights (Power, Internet and Line 1 registration).
        • Make a test call to 09002 free number to check your sound.

            Please check Cisco SPA 112/122 user manual if you require more detailed information.


facebook share  Share your experience about us in your Socials !

   
© AUSTRALIAN PHONE COMPANY 2011-2022
...